3가지 구축 환경
1) VMware Workstation 위에 VMware Esxi 올리고, 웹에서 새로운 가상 머신 생성
2) VMware Esxi (Bare Metal) 이용 (부팅 USB 이용하여 설치, 컴퓨터 2대인 사람들에게 유리)
3) VMware Workstation만 이용 (컴퓨터 성능 좋지 않은 사람들에게 추천)
0) vCenter 구축 개요

Hypervisor가 VMware Esxi이다. Esxi는 하드웨어 위에 직접 설치할 수 있는 독립적인 운영체제이며, Esxi 위에 새로운 가상 서버를 설치할 수 있다. (Bare-Metal : OS가 없다, 즉 Esxi는 Bare-Metal Hypervisor이다.)
기존의 구성은 Application - OS - 하드웨어로 이루어져 있는데, 복구 및 복제할 때 시간 소모가 크다. 하지만, Esxi를 이용하면 snapshot 이용하여 복구도 빠르고, 가상 서버 자체를 저장하여 export도 가능하다. 즉, 확장 및 유지보수에 유리하다.
설치 방법은 VMware Workstaion Pro 16 설치 후, VMware Esxi 6.7.iso 업로드하여 설치 진행
1) vCenter를 Esxi로 설치
window 10 home과 window 11 home은 hyper -v 기능을 제공하지 않는다.
아래 링크 참고
2024.01.24 - [보안 관제 및 인프라] - [Trouble Shooting] window 11 home에서 vmware esxi 설치 (해결)
[Trouble Shooting] window 11 home에서 vmware esxi 설치 (해결)
VMware-workstation-16-pro을 설치하여 vCenter 구축하려고 한다. (vCenter 버전은 6.7을 이용하였다.) 설치 시 유의할 점은 hyper -v는 활성화하지 않는다. 설치할 때 체크 해제한 뒤에 설치하면 된다. 문제점 1)
tinokim.tistory.com
사양 정보
CPU 4 x 2
RAM 24GB
200GB (한 번에 사용하는 것이 아니기 때문에, 크게 잡아도 무방)
디스크 옮길 일이 없는 경우에는, single file로 저장 진행
dhcp에 의하여 아이피 할당되기도 하지만, 고정적으로 설정 가능 (Statics IP, IPv4 Configuration 통하여 진행)
* 이 사이트는 보안 연결(HTTPS)이 사용되지 않았습니다.
우리가 만든 서버는 https 프로토콜이라는 통신 규칙을 이용하여 통신하는데, https를 이용하기 위하여 키가 일치하는지 판단하는 SSL 인증서가 필요, 하지만 서버가 안전한지 판단 불가능하기 때문에 "주의 요함" 이라는 문구가 뜬다.
(왜냐하면 내가 서버 생성할 때 인증서 생성 안 했기 때문에)
2) 리눅스 민트 클라이언트 설치
특징) 윈도우보다 가볍고, 우분투 데스크탑 중 하나
데이터 스토어에 iso 파일 업로드 후, 정상적으로 업로드 되었다면 VM 생성 및 등록 진행하기.
* 디스크 지우고 Linux Mint 설치
하나의 디스크를 하나의 파티션으로 이용하기 위한 목적
새 가상 시스템 생성 (새로운 가상 서버 구축)
ㄴ vCenter와 다르게 하드 디스크 설정 시 모두 이용하게 되니, 주의하면서 설정 진행
ㄴ 가벼운 버전인 iso는 1 CPU와 1MB RAM 그리고 16GB HDD면 충분
ㄴ 디스크 프로비저닝을 "씬 프로비저닝"으로 선택 (씬 프로비저닝이 씩 프로비저닝보다 서버 생성 속도가 빠름, 효율적이라고 볼 수 있음)
| 씬 프로비저닝 | 씩 프로비저닝 |
| 사용하지 않는 디스크는 가상으로 채움 | 사용하지 않더라도 실제로 채움 (디스크 소모량 많음) 사용하지 않는 디스크에 새로운 데이터가 들어오는 경우 비워줘야 하는 작업이 필요 (느리게 혹은 빠르게) 1) 느리게 비워짐 2) 빠르게 비워짐 |
OVF 또는 OVA 파일에서 가상 시스템 배포
export 처리했던 .ovf나 .ova 파일 업로드하여 진행
3) rufus 이용하여 부팅 usb 생성하여 Esxi 설치 진행
부팅 USB를 만들어서 OS 설치하기 위한 목적
1) rufus 이용하여 usb에 iso 파일 업로드 (부팅 usb 생성 완료)
2) 부팅 가능한 컴퓨터에 usb 꽂으면 BIOS 화면이 뜨며, Boot option을 usb를 1순위로 변경
3) OS 설치 완료
4) 가상 네트워크 어뎁터 설정 후 연결 확인
네트워크 설정 방식 (NAT 변경)
vmnet2로 변경한 뒤 vmware esxi와 ubuntu-server가 정상적으로 ping 가는지 체크
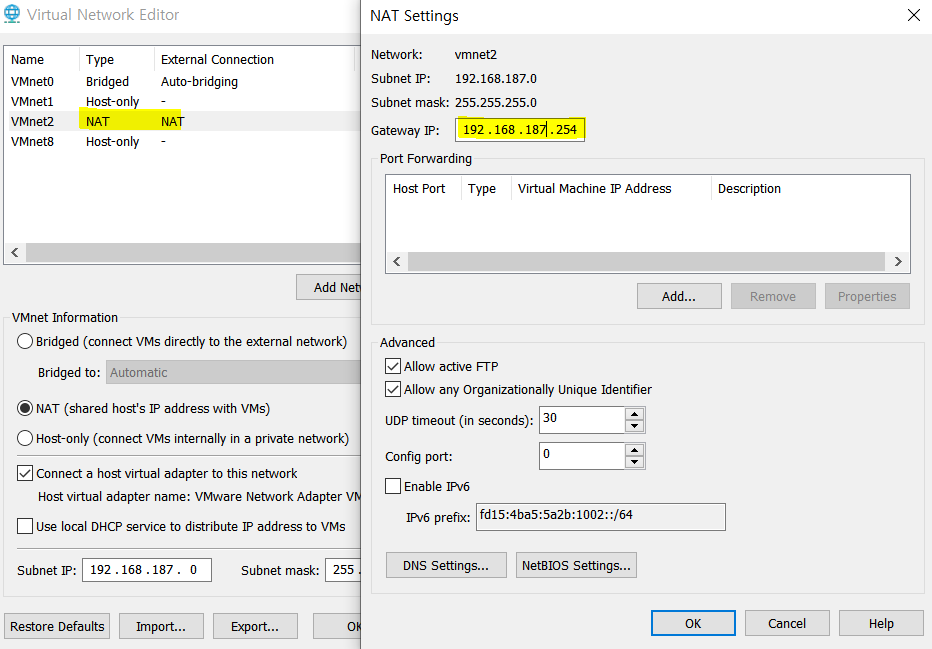
1) 가상 네트워크 에디터에서 vmnet2 추가 (NAT)
vmware workstation pro에서 새로운 네트워크 어뎁터 생성 (물리적인 장비와 인터넷 연결할 때 지나가는 통로 생성)
2) vmware esxi 고정 설정
vmware esxi (hypervisor)의 네트워크 어뎁터를 위에서 생성한 네트워크 어뎁터로 변경 후 고정 IP 설정
- IP : 192.168.187.128
- GW : 192.168.187.254
- Subnetmask : 255.255.255.0
https://192.168.187.128 통하여 vmware esxi 접속 가능
3) ubuntu server 고정 설정
esxi에 접속하여 우분투 서버 생성 후, 우분투 서버도 고정 IP 설정 진행
- IP : 192.168.187.129
openssh 서버 설치 (프로토콜 ssh 통하여 접속 시 활용)
ubuntu server에서 vmware esxi가 잘 접속되는지, ping 잘 가는지 확인
5) ubuntu server에서 고정 설정 및 Trouble Shooting
1) 우분투 서버 설치 후 netplan에서 고정 설정
2) ssh 이용하여 mobaexterm으로 접속해보기
3) 우분투 서버에서 esxi로 ping 날려보기 (192.168.187.128)
4) 우분투 서버에서 인터넷으로 ping 날려보기 (8.8.8.8)
문제 1) VMware workstation pro에서 가상화 네트워크 제대로 설정 안 됨 (NAT option에서 GW 설정)
문제 2) 우분투 업데이트 서버와 연결이 되지 않는 문제 (인터넷과 연결되지 않아서 생기는 문제, DNS 서버 추가)
VMware workstation pro에서 가상화 네트워크 어뎁터 추가 진행
- IP, GW, DNS 등 기본적인 설정은 고정적으로 설정하기 위한 목적
- 추가적으로 host-only는 VMware Esxi (Hypervisor)와 가상 서버 간의 통신만 허용
- NAT는 VMware Esxi (Hypervisor)와 가상 서버, 그리고 외부 통신까지 허용
Trouble Shooting 과정 및 해결
1) NAT option에서 게이트웨이까지 설정 진행 (NAT 이용하여 host-pc IP와 인터넷 통신 가능하도록, 즉 host-pc IP가 공인 아이피 역할 진행)
2) 인터넷이 연결되지 않아서 우분투 업데이트 서버와 연결이 되지 않아서, 업데이트가 불가능한 문제 발생
DNS 서버 추가하여 인터넷 연결 허용 진행
// 우분투 서버에서 고정적으로 설정 진행 (ssh 이용하여 mobaxterm에서 설정 진행)

xudegloss@user:~$ cd /etc/netplan
xudegloss@user:/etc/netplan$ cat 00-installer-config.yaml
# This is the network config written by 'subiquity'
network:
  ethernets:
    ens160:
      dhcp4: false
      addresses: [192.168.187.129/24]
      gateway4: 192.168.187.254
      nameservers:
              addresses: [8.8.8.8]
  version: 2
// resolve.conf 확인
// 만약에 외부 통신 안 되는 경우에는 8.8.8.8 또는 8.8.4.4 추가 진행

xudegloss@user:/etc$ cat /etc/resolv.conf
# This file is managed by man:systemd-resolved(8). Do not edit.
#
# This is a dynamic resolv.conf file for connecting local clients to the
# internal DNS stub resolver of systemd-resolved. This file lists all
# configured search domains.
#
# Run "resolvectl status" to see details about the uplink DNS servers
# currently in use.
#
# Third party programs must not access this file directly, but only through the
# symlink at /etc/resolv.conf. To manage man:resolv.conf(5) in a different way,
# replace this symlink by a static file or a different symlink.
#
# See man:systemd-resolved.service(8) for details about the supported modes of
# operation for /etc/resolv.conf.

nameserver 127.0.0.53
options edns0
// vmware esxi와의 정상 통신 확인
xudegloss@user:/etc$ ping 192.168.187.128
PING 192.168.187.128 (192.168.187.128) 56(84) bytes of data.
64 bytes from 192.168.187.128: icmp_seq=1 ttl=64 time=0.964 ms
64 bytes from 192.168.187.128: icmp_seq=2 ttl=64 time=1.17 ms
64 bytes from 192.168.187.128: icmp_seq=3 ttl=64 time=1.44 ms

--- 192.168.187.128 ping statistics ---
3 packets transmitted, 3 received, 0% packet loss, time 2007ms
rtt min/avg/max/mdev = 0.964/1.191/1.438/0.193 ms


// gw와의 정상 통신 확인
xudegloss@user:/etc$ ping 192.168.187.254
PING 192.168.187.254 (192.168.187.254) 56(84) bytes of data.
64 bytes from 192.168.187.254: icmp_seq=1 ttl=128 time=0.734 ms
64 bytes from 192.168.187.254: icmp_seq=2 ttl=128 time=1.73 ms
64 bytes from 192.168.187.254: icmp_seq=3 ttl=128 time=1.87 ms
64 bytes from 192.168.187.254: icmp_seq=4 ttl=128 time=1.84 ms

--- 192.168.187.254 ping statistics ---
4 packets transmitted, 4 received, 0% packet loss, time 3010ms
rtt min/avg/max/mdev = 0.734/1.544/1.874/0.470 ms


// host-pc와 정상 통신 확인
xudegloss@user:/etc$ ping 192.168.251.109
PING 192.168.251.109 (192.168.251.109) 56(84) bytes of data.
64 bytes from 192.168.251.109: icmp_seq=1 ttl=128 time=1.26 ms
64 bytes from 192.168.251.109: icmp_seq=2 ttl=128 time=2.96 ms
64 bytes from 192.168.251.109: icmp_seq=3 ttl=128 time=3.11 ms
64 bytes from 192.168.251.109: icmp_seq=4 ttl=128 time=3.03 ms

--- 192.168.251.109 ping statistics ---
4 packets transmitted, 4 received, 0% packet loss, time 3009ms
rtt min/avg/max/mdev = 1.261/2.590/3.105/0.769 ms


// 인터넷과 정상 통신 확인
xudegloss@user:/etc$ ping 8.8.8.8
PING 8.8.8.8 (8.8.8.8) 56(84) bytes of data.
64 bytes from 8.8.8.8: icmp_seq=1 ttl=128 time=168 ms
64 bytes from 8.8.8.8: icmp_seq=2 ttl=128 time=219 ms
64 bytes from 8.8.8.8: icmp_seq=3 ttl=128 time=201 ms

--- 8.8.8.8 ping statistics ---
4 packets transmitted, 3 received, 25% packet loss, time 3009ms
rtt min/avg/max/mdev = 167.778/196.113/219.305/21.347 ms


// 구글과 정상 통신 확인
xudegloss@user:/etc$ ping www.google.com
PING www.google.com (142.250.206.196) 56(84) bytes of data.
64 bytes from kix07s07-in-f4.1e100.net (142.250.206.196): icmp_seq=1 ttl=128 time=66.5 ms
64 bytes from kix07s07-in-f4.1e100.net (142.250.206.196): icmp_seq=2 ttl=128 time=81.7 ms
64 bytes from kix07s07-in-f4.1e100.net (142.250.206.196): icmp_seq=3 ttl=128 time=83.3 ms

--- www.google.com ping statistics ---
3 packets transmitted, 3 received, 0% packet loss, time 2006ms
rtt min/avg/max/mdev = 66.450/77.151/83.321/7.596 ms'security > A. Infra Security' 카테고리의 다른 글
| [인프라] 구축 과정 (중간 점검) (0) | 2024.02.23 |
|---|---|
| [Trouble Shooting] pfsense 패키지 목록 안 보이는 문제 (해결) (0) | 2024.02.05 |
| [인프라] 구축 과정 (0) | 2024.01.25 |
| [Trouble Shooting] window 11 home에서 vmware esxi 설치 (해결) (1) | 2024.01.24 |
| [인프라] OT 및 이유와 목적 (0) | 2024.01.15 |

